A sump pump should be able to keep your home protected from flood damage as long as you keep up with routine maintenance. Start by ensuring your pump is connected to the power supply and plugged in properly.
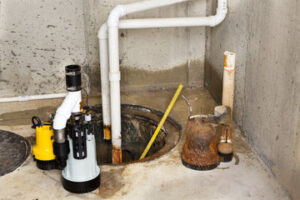
Then find the discharge line and ensure it leads away from your foundation, not towards it. Check that the line is not clogged or filled with debris. Contact Plumber Spring TX for professional help.
The float is one of the most important parts of your sump pump. It rises when it senses water in the basin and triggers the pump to turn on. It also stops the pump when it reaches its end of its cycle. This is why it is so crucial to check the float for wear and tear each year.
Grasp the float in your hand and test it by lifting it as high as you can. If it starts the motor, then your float is working correctly and your pump is doing its job. If it doesn’t, there could be an issue with the float switch or even the discharge line. You will need to examine the float and check on the lines for any debris or blockage, and you will likely have to replace the pump.
If your float isn’t working properly, the first thing you should do is remove the pump from the pit and put it into a bucket or trash bag to prevent a mess. Then you can use a wet vacuum to get rid of any water in the pit and clean out any dirt or sediment. Examine the discharge line for any blockages as well, especially since this is where a lot of sediment tends to collect over time. It is a good idea to replace the discharge line on an annual basis, too, as it can clog easily with debris and cause your pump to start running continually.
Once you have removed the pump, plug it back in and reconnect any electrical or plumbing lines that were disconnected while removing the unit. Then, refill the sump basin with five gallons of water and watch the float switch to see if it moves through its full range without binding or turning the pump on and off at the proper times. If not, you’ll need to install a new float switch. It’s a good idea to look for a replacement that is the same type as your existing one, so you can use your old wires. Also, check the owner’s manual for your pump to see if the bearings need lubrication.
Inspect the Check Valve
Your sump pump needs a check valve on the discharge line to prevent water from back-flowing into the pit after it pumps it out. This one-way valve opens to let the water flow out and snaps shut to keep it from flowing back into the pump when it stops running. If you notice that your sump pump fills up with water again right after it finishes its cycle, this means the check valve isn’t working correctly.
This can happen if the valve is leaking, or if it’s not installed properly, so you should inspect it regularly. You can do this by pouring water into the pump to activate it, then watching to see how it behaves. A good check valve will quickly open and close to allow the water out and then snap back shut, preventing reverse flow.
A bad check valve can wear out very quickly, so if you’re seeing signs of deterioration or not sure how to test it, you should replace it as soon as possible. You can also inspect your pump’s discharge pipe for any damage that may be causing water to back-flow into the pit, and make sure there are no obstructions in it.
It’s a good idea to remove your pump from the basin and clean it at least once each year. You’ll be able to examine it for external damage, clean the grate, check the drainage pipes, and remove debris from the pump inlet screen or pit. This is a good time to also lubricate the pump bearings if needed.
Unplug the pump and drain any water in the basin with a wet vacuum. You can also disconnect the discharge pipe from the pump if you’re able to reach it easily, but be careful not to damage the plumbing. Drain the check valve as well, and then use a wet vacuum to get rid of any debris left in the basin or discharge pipe. Once you’ve finished, plug your pump back in and test it by pouring five gallons of water into the pit to see that the float switch is activating the pump and pumping out the water as it should.
Test the Alarm
A sump pump alarm is similar to a smoke alarm in that it will activate and let you know something’s wrong. Unlike smoke alarms, however, a sump pump will tell you if the problem isn’t a blown fuse or a faulty circuit breaker—in most cases, it’ll indicate that your sump pump is not working correctly. It might have an underlying issue that requires outside assistance to resolve.
If your sump pump keeps cycling on and off during heavy rainstorms, it might not be able to keep up with the water that’s flooding into the basin. If this is the case, it’s important to have a professional inspect the pump and see whether it can be upgraded to match your home’s needs.
It’s also important to regularly test the pump. Pour about five gallons of water into the basin to see if the pump activates and pumps out the water properly. Also, check the inlet screen and clean it if necessary. If you need to, use a brush and cleaner to scrub the inlet screen to make sure it’s clear.
Lastly, inspect the discharge line to ensure it’s not clogged or blocked by sediment. It’s also important to test the backup power source to ensure it works properly, which will help you avoid a flooded basement in the event of a power outage or the primary sump pump fails.
In between annual visits from a plumbing professional, you can do some basic maintenance to extend the lifespan of your sump pump. First, verify that the power cord is plugged in properly and re-check the outlet for any signs of damage. If you don’t have a dedicated outlet for your sump pump, consider installing one or using an extension cord until you can have the pump’s original outlet fixed. Finally, test the backup power source to see if it’s functioning properly (it should have a built-in surge protector or a GFCI socket that automatically shuts off).
Clean the Inlet Screen
The inlet screen is a vital component of the sump pump that prevents dirt, rocks, and other debris from being sucked inside the unit when it runs. When it’s clogged, it can prevent the pump from working properly and causing your basin to overflow and your house to flood. To clean it, unplug your sump pump and remove it from the pit. Then, turn it over and use a toothbrush to gently scrub away any dirt or grime.
It’s also a good idea to clean the inlet screen at least once per year. While you’re at it, you should also remove the discharge pipe and clean it thoroughly as well. Be sure to check that the pipe is not clogged and is emptying far enough away from your home (most municipalities have regulations about how close to a structure a sump pump can drain water).
You should also ensure the grate on the bottom of the sump pit is secure. This is where most of the sludge collects and can cause problems if it’s not removed regularly. It’s best to hose off the grate as well, and for any caked-on gunk, you can use a scraper to remove it.
After cleaning the sump pump, you can reattach the discharge pipe and plug in the power cord. Before you do, however, you should recheck the GFCI (ground fault circuit interrupter). If it’s still tripping, press the reset button to clear the issue.
Finally, you should check the owner’s manual to see if your pump requires lubrication of its bearings. If it does, follow the directions in the manual to do so.
Once you’ve completed these steps, you should be able to safely start your sump pump and perform a test run. By following these simple steps, you can keep your sump pump running smoothly and avoid the stress of a sudden failure when you need it most. If your sump pump fails to work correctly, you can always count on a professional service to help! We offer a variety of plumbing services including sump pump installation, repairs, and maintenance.