HVAC

Troubleshooting HVAC Systems

HVAC Los Angeles systems include air conditioners, furnaces, air handlers and ductwork that move cool and warm air throughout a home or building. They are operated by control systems like thermostats. IAQ components like air purifiers and humidifiers are add-ons to many HVAC systems.

HVAC

Air conditioning systems cool indoor air by absorbing heat from it and releasing cooling energy into the environment. They also ventilate the system to replace stale air with fresh outdoor air.

If you’re having trouble getting your furnace to start working, there are a few things you can try. Check to make sure that the thermostat is in “heat mode,” and adjust it up a few degrees. Also check that the a.m. and p.m. settings are correct, since these often get changed when you have a power outage and the thermostat reverts to its default program. Check the wiring to make sure that nothing has come loose or broken, particularly if you’ve done any remodeling in your home recently. You can also open the thermostat and gently blow out any dust, but be careful not to damage the thin wires.

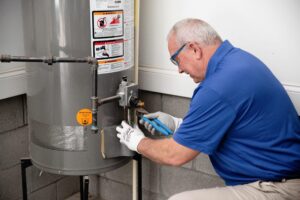
Another possibility is that your gas valve has been closed. To check this, follow the flex pipe from the gas meter to the furnace, which will connect to black metal pipe with a valve. The valve will likely be in the off position, and will need to be turned on. If this doesn’t work, your problem may be a bit more serious and you’ll need to call in an expert.

The other possibility is that the fan setting on the thermostat has been changed to “fan continuous.” This will cause the fans to run constantly, and will not allow the heater to turn on. It’s worth checking this, although you should keep in mind that the blower motor is not the same as a fan. You can also look in the ducts for any handles that protrude out, which are the dampers that control air flow.

Your last resort, assuming the above steps have not solved your issue, is to reset the ignitor/sensor. Consult your user manual for instructions on how to do this, as it’s a fairly technical process and requires you to remove the front panel of your furnace.

Depending on the results of these troubleshooting steps, you may have to replace a blown fuse or tripped circuit breaker. Then you should be able to get your furnace up and running again. If not, it may be time to call in a professional from Billings HVAC.

The Cooling Isn’t Working

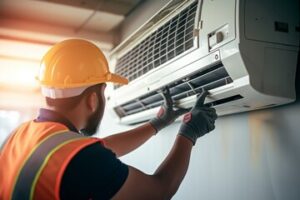
One of the most important functions of HVAC, especially in a home, is cooling. Some systems cool with a conventional air conditioning unit, while others (including heat pumps) cool with a device similar to the one used in a furnace. Either way, the purpose is to grab warm indoor air and move it outside, which lowers the indoor temperature.

The main parts of an HVAC system that are involved in cooling are the indoor air handler and outdoor condenser. Forced-air systems (which use ductwork to distribute the air) have an air handler that houses some of the AC components, while central and split air conditioners have separate units for heating and cooling.

Most air conditioners also have a drain pan that collects excess water. If the drain pan gets full, it triggers a float switch that shuts off the AC. This is an important safety feature that helps prevent flooding in your house, but if it happens frequently, it may be because the air conditioner is not big enough for your home.

Another common problem is that the blower motor is not working, which can cause the system to fail to turn on. This can be caused by a number of things, including a dirty air filter or clogged vents. In some cases, a blower fan motor can simply burn out.

It’s also possible that the AC isn’t getting power. This can be due to a number of things, but it’s often because the breaker box has been tripped. Try to find the breaker that’s linked to your HVAC system, and flip it back on.

There are also some problems that can be difficult to fix on your own, but which are still relatively affordable. For example, if the capacitors inside your outdoor unit are on the fritz, you might need to get them replaced by an HVAC pro. These components — which look like giant batteries — give the motors their initial push to start running, and they have a limited lifespan.

Other HVAC-related problems can be more expensive, such as an a/c compressor that has failed or an outdoor unit that has lost refrigerant. In these instances, you will need to have the entire unit inspected and repaired by an expert.

The Thermostat Isn’t Working

Your thermostat is a key piece of equipment that regulates your HVAC system. So, when it’s not working correctly, it can throw off the whole system. Fortunately, there are some simple things you can do to troubleshoot what might be wrong with your thermostat and get it back up and running.

First, check to see if the batteries are dead. If they are, replace them and power up the thermostat. If that doesn’t work, try removing the cover and checking to see if the wires are plugged in. If you’re not comfortable messing around with the wires (it can be dangerous), you can call in a professional to open up the thermostat and see what’s going on.

Another common thermostat problem is that the fan is continuously running, even when the temperature settings are turned off. This can occur if the setting is on “auto,” which means the blower will always run, even when the system isn’t heating or cooling.

If you’re noticing that the temperature on the thermostat doesn’t match what it feels like in your home, it could be an issue with the sensors. These can be caused by a number of factors, including improper placement and dust build-up. If the thermostat is constantly recalibrating itself, it can also cause problems with its readings.

A tripped circuit breaker can also cause your thermostat to stop working. If this is the case, you’ll need to locate your breaker box and find the breaker that controls your thermostat. Switch it off and then on again to see if this fixes the issue.

Your thermostat has many electrical connections that serve various functions, from displaying the temperature to communicating with your HVAC unit. These can become loose, especially if you’ve had the thermostat for several years or it was installed incorrectly. Additionally, vibrations or rodents in the attic can affect these connections and lead to issues with your thermostat. If the above steps don’t solve your problem, it’s time to call an HVAC specialist. They’ll have the training and tools needed to figure out what’s going on with your thermostat and fix it quickly.

The Ductwork Isn’t Working

If you notice that some rooms in your home aren’t getting heated or cooled as well as other areas, the problem may lie with your air ducts. This is because your HVAC system might be working overtime to keep up with a limited amount of air being pushed through the vents. A professional can use a special camera to inspect the ductwork for leaks or blockages that are impeding the flow of air.

If the ducts are dirty, there’s a good chance that you won’t be able to solve the problem by simply cleaning them. While air filters are designed to keep most dust, dirt and other particles out of your HVAC system, there’s no limit to the amount of small debris that can accumulate in a duct over time. If this builds up, it can cause a variety of issues including poor airflow and lowered indoor air quality.

Other issues with ductwork include problems with sizing. If your ducts are too big, they’ll struggle to maintain the required pressure in the system and cool or hot air will have difficulty reaching all areas of the house. Conversely, if your ducts are too small, they won’t be able to adequately distribute the desired temperatures.

Another common issue is that there aren’t enough return or supply vents in the home. It’s important to have an adequate number of both so that the blower can suck in return air from all the room in the house, helping to balance the pressure in the ductwork and improve the HVAC airflow.

A final issue that sometimes occurs is that the ductwork itself may be damaged. This can be caused by physical obstructions, like furniture blocking a vent or a buildup of dust over time. In this case, it might be possible to fix the problem by rearranging furniture or cleaning the vents. In more serious cases, it might be necessary to replace the ductwork entirely.

Plumbing

Important Features of Water Heaters

Aurora CO Water Heater Repair are important appliances used to sanitize dishes, wash clothes, and provide hot shower water. The peak hour demand of your household usually sizes water heaters.

Peak hour demand is calculated by counting the number of occupants in your household and multiplying it by 12. A typical water heater has an EnergyGuide label, which lists its first-hour rating.

A water heater thermostat controls the temperature of the hot water. It does this by sending an electrical current to the heating elements, which are located inside the tank. The thermostat also detects when the water reaches the desired temperature. This prevents the elements from constantly operating, which can save energy and reduce utility costs. A programmable thermostat can also schedule heating cycles during off-peak hours.

The thermostat is located beneath the cover plate of the tank and has a dial to indicate its setting. This can be adjusted to suit your needs, but it is a good idea to keep the temperature below 140 degrees Fahrenheit because this will prevent water from being scalded. If your house has long, uninsulated pipes, raise the temperature above 120 degrees Fahrenheit to compensate for lost heat.

Most modern water heaters are tank types, which consist of insulated tanks that can hold between 20 to 80 gallons. These can be powered by electricity, natural gas, propane, or fuel oil. Most household use is with electric tank-type units, but gas heaters are also available.

These tanks are fed by a dip tube that provides cold water from the home’s plumbing to the bottom of the tank. The thermostat monitors the temperature of the water, and when it drops below a pre-set level, the heating mechanism — either an element or burner — kicks in to heat the water.

If the thermostats are faulty, it may be time to replace them. To do this, first shut off the power supply to the unit. Then, find the access panel, which is usually covered with insulation. Remove the insulation, and then unscrew the thermostat screws. Once the new thermostat is in place, turn the power supply back on.

A conventional tank-style water heater has a metal outer shell that encases a pressure-tested glass or plastic liner with a heating mechanism inside. Its capacity varies, but it usually holds 40 to 60 gallons (151 to 227 liters). The fuel source is also important, as natural gas, propane, or fuel oil are common. Some tank models have a built-in solar or geothermal energy system for greener choices.

The hot water supply pipe enters the tank through a dip tube at the bottom. Once the water is heated, it’s displaced and rises to the top of the tank. The hot water is then sent into the home’s plumbing systems.

A metal flue running through the center of the tank serves two purposes: it exhausts combustion gases and helps heat the water. There are specific code requirements for constructing the flue, and it must be properly vented outside.

In addition to the water supply and drain valves, the tank has a safety valve that vents pressure and vapor. It’s also fitted with a thermocouple to sense if the heating element burns out or the temperature is unsafe.

Inspect the tank for rust, dents, or leaks regularly. If your water heater starts leaking, shut off the fuel or cold water supply and call in a professional for a repair. A professional can also help you determine if your water heater is the right size for your household. This involves measuring your peak hour usage to calculate your Family Heat Rate (FHR). In some cases, it might be better to have a smaller tank rather than a larger one. This is especially true if your household uses energy-efficient appliances and takes shorter showers.

A drain valve allows air to exit the tank, removing collected condensate. It consists of a stem that runs parallel to the body’s hollow section and can be lowered or raised to open or close the passage. The stem of certain drain valve designs prevents flow, while the stem of others raises or lowers a flow-blocking gate in the shape of a disk or ball. Many variations on these basic models can accommodate different levels of fluid service and operational needs.

Water heater tanks collect contaminants such as calcium, other mineral sediments, and dirt in their bottom. These substances reduce the tank’s heating efficiency and can damage components. To keep them operating at full capacity, these contaminants must be removed from the tank regularly.

To empty the tank, you must shut off your water valve and drain it through its drain valve. You’ll also need a bucket and towels to catch the water that will be pouring out. It would be best to shut off the power to your tank before beginning work.

To open the drain via:

  1. Locate the coupling nut positioned underneath the regulator valve side of your ta
  2. k. Use an adjustable spanner to rotate the nut in a counterclockwise direction. Once it’s open, you can remove the nozzle and attach a hose to the drain valve
  3. Place the hose in a bucket to help speed up the draining process.

s.

The temperature and pressure relief valve is an essential safety feature of your water heater. When the tank becomes too hot or pressurized, this valve is designed to open and release the excess water into a discharge pipe. This protects the water heater from bursting, which can cause serious property damage and injury.

The water heater’s pressure valve is located at the top of the water tank. It has a metal lever that can be opened or closed manually and a discharge tube that runs down to a safe spot for the water to discharge. The water heater’s owner’s manual should specify the steps to open the pressure valve. It’s a good idea to wear closed-toed shoes when doing this to reduce scalding risks.

You should also make sure that the discharge tube is a safe distance from the water heater and is not obstructed by any objects. The discharge pipe should run to a bucket or a drain to catch the discharged water. It should be 1.5″ off the floor and be made of copper, CPVC, or galvanized steel water piping.

The pressure valve should be tested by opening it at least once a year. This ensures that the waterways are clear and that the valve is working properly. If you suspect that the water pressure valve is leaking or not functioning, it’s best to call in a professional to replace it.

The anode rod is a steel core wire surrounded with aluminum, magnesium, or zinc that screws into the top of your water heater. Often referred to as the “sacrificial rod,” the anode rod is meant to draw the corrosion process away from your tank’s steel lining and toward itself, protecting the more expensive steel components in your water heater.

You can replace your anode rod by purchasing a new one at your local hardware store. The choice of material depends on the chemistry of your water. For example, magnesium is typically used for most homes with hard water because it “gives up” electrons faster than aluminum, protecting the more expensive carbon steel tank lining from rust.

If you live in a soft water area, use an aluminum anode rod because it erodes more slowly. It would be best if you replaced your anode rod every three years or so, depending on the water chemistry in your area.

The longer your anode rod lasts, the less likely you are to call a plumber to repair or replace your water heater. If you have a rotten egg smell, the air in your lines, or your hot water seems choppy, your anode rod may need to be replaced.

Unless your water heater has a dedicated hole for the anode rod, it will be close to the flex line that attaches to the hot water outlet. The rod is usually labeled on the unit and locked into place with a hex nut. Once the hex nut is loose (which you can do with a crescent wrench, channel locks, or a socket wrench), you can pull out the rod and inspect it for signs of deterioration.

Plumbing

How to Do Your Own Plumbing Repair

plumbing repair

Plumbing repair involves dealing with a wide range of issues. Some of the most common issues include clogs, leaks, and noisy pipes.

If you notice any of these signs, it’s time to call Plumber Linden NJ for plumbing repair. Some of these problems can be easily fixed, while others require more intense work.

Pipe leaks are a common plumbing issue that can be costly to repair. Thankfully, there are many easy and affordable DIY plumbing repair steps that you can take to fix a leaky pipe.

The first step is to identify the source of the leak. Leaks can be located in a variety of ways, including water spots on the ceiling or walls, damp floors, or a sudden increase in your water bill. Once you have identified the source of the leak, it is time to start repairing it.

Before you begin repairing your leaky pipes, make sure to shut off the water flow to the affected area by turning off the valve that controls water supply to the fixture in question (see How to Shut Off the Water). This will prevent further damage and will allow you to safely complete the repair work.

Next, it is important to dry the area around the leaky pipe, as this will help you achieve a successful seal with your pipe tape. There are several different types of pipe tape on the market, so be sure to choose the one that is best suited for your situation. If you are unsure which type of pipe tape is right for your needs, consult with a professional plumber.

When using pipe tape to repair your leaky pipe, follow the package instructions carefully. Generally, you will need to apply multiple layers of tape, ensuring that each new layer overlaps the previous one by at least 50%. Once you have applied all the necessary layers of pipe tape, it is important to crimp the end of the affected pipe with a pipe crimper. This will create a waterproof seal that will stop further leaks.

If you don’t have any pipe tape on hand, you can also use epoxy putty to seal a leaky pipe. Similar to pipe tape, this fast-drying putty can provide a temporary solution until you can call in a professional plumber for a permanent repair.

Another quick and inexpensive way to repair a leaky pipe is by using a pipe repair clamp. These handy devices can be found at most home improvement stores and contain a rubber gasket that fits snugly over the leaky section of pipe. To use, simply loosen and remove the bolts from the clamp, then line up the gasket with the leaky section of pipe and place the clamp directly over it. Once the bolts are back in place, tighten them to secure the clamp and compress the gasket against the leaky section of pipe.

Cracked Pipes

A cracked pipe is a plumbing nightmare waiting to happen, as it can lead to flooding, water damage, sewage back-up and blockages, and an expensive water bill. If you notice a crack in your pipe, it’s important to turn off the water supply and call a plumber right away. However, if you can’t get to a plumber quickly, you can take a few precautions to minimise the damage.

The first step is to shut off the water supply at the affected area, allowing the water pressure to drop. Next, clean any corrosion off the surface of the cracked pipe using a wire brush and sandpaper to ensure a smooth finish for the patching material. Finally, apply a thin layer of epoxy putty over the damaged area and let it sit for 30 minutes to cure. You can also use fiberglass wraps and patches on pipes up to 6 inches in diameter, which are an effective short-term solution and should be kept in your emergency repair kit.

You can also try sealing the crack with electrical or duct tape, which will hold up for a day or so until you can find an emergency plumber. However, it’s important to make sure the leak is completely stopped before continuing with this fix. It’s also essential to check for other signs of a crack in your pipe, such as gurgling noises, sagging floors or walls, and even mold (which can grow at a rapid rate in damp, warm areas).

A more permanent and effective way to fix a cracked pipe is to solder on a new fitting. This involves removing the old fitting, cleaning it with a wire brush, and sanding down the pipe to prepare for soldering. Then, use a propane torch to heat the solder until it melts and joins the two ends together. Once the joint has cooled, tighten the nut and seal with putty or silicone sealant. Again, it’s always best to leave the soldering to a professional, but these steps will help keep your home safe until a plumber can come out and assess the situation.

Leaking Fittings

When a plumbing connection leaks it is often because the sealing surface of the fitting has been damaged. This can be caused by carelessly tightening a pipe nut or simply by age and wear and tear. Even a professionally soldered joint can sometimes start to leak if the sealant was not high quality. Professional plumbers use thread tape or joint compound on pipe fittings when they connect them to prevent leaks from forming.

If you have a leaking pipe fitting, the first thing to do is to turn off the water supply so that no more water can flow through the damaged pipe and potentially cause further damage. Then you can take a look at the fitting and decide on a course of action.

Depending on the type of pipe you have (galvanized, PVC, CPVC, PEX) you will need to determine which kind of repair method to use.

For leaking PVC joints you will need to clean the area around the leak and then apply repair tape or epoxy putty. When using repair tape make sure to stretch it tightly and cover the entire leaking area. Allow the tape or putty to dry before using the pipe again.

When you are working with copper pipes it is important to heat the whole piece of pipe before soldering to prevent a cold spot that can allow water to leak through. If you are working with other metals, be sure to properly flux the joint before applying solder. Letting the solder cool before moving on can also help to prevent a weak seal.

If the leaking pipe is at a fitting, you can try to tighten the nut. If this does not work then you may need to consider replacing the faulty fitting.

Blocked Drains

Blocked drains can cause waste to back up into your home, resulting in unpleasant smells and potential structural damage. When a clog occurs, it is important to take action quickly before the problem worsens.

While you can try some DIY solutions, such as pouring baking soda and vinegar down the drain, more serious clogs require professional help. In this case, plumbers use a variety of tools to clear the blocked drain and restore proper function.

One method is called “hydro-jetting.” This involves directing high-pressure water through the pipe to break up and wash away obstructions. It can also remove roots that have grown into pipes. Plumbers may also use snakes, augers or other mechanical devices to clear more stubborn clogs. In extreme cases, they may need to remove and replace the clogged section of pipe.

It is possible to prevent drain blockages by monitoring what goes down the drains on a regular basis. This includes scraping plates thoroughly, using adequate soaps and detergents and avoiding pouring grease down the drain pipes. It is also a good idea to keep a tub of Bio-Clean in your house, which is a safe, natural product that introduces bacteria into the drain system to break down organic waste and other debris that can clog drains.

Most clogged drains are caused by foreign objects that get flushed down the toilet. These can include anything from cotton pads and baby wipes to sanitary products and kids toys. These items are not designed to be flushed and can clog pipes and cause overflows. If you have a serious blockage, it is important to call a plumber as soon as possible. In addition to clearing drains, plumbers can also install new ones, which is often a more cost-effective option than replacing damaged ones.

Plumbing

The Benefits of Leak Detection

Unexplained wet spots around the property, increased water bills, or mildew could signal a hidden leak. These leaks can cause extensive damage over time and lead to expensive repairs.

Ensure your appliances are switched off, and read the dials on your water meter. If they move after an hour of not using water, there is a leak somewhere.

A sonic leak detection system harnesses sound’s power to pinpoint a water leak’s exact location. It’s like a sensitive microphone that hears the distinctive noise of water escaping from a pipe under pressure, reverberating as a hissing or whooshing sound. The detectors then translate that audio into a visual display or decibel reading, helping inspectors locate the source of the leak by following it to its loudest point.

The sensors can detect gas leaks by picking up the sound of escaping compressed air at ultrasonic frequencies. These sensors are ideal for applications where a gas leak could create an unsafe working environment, such as confined spaces or industrial environments. The detectors are designed to detect the sound of escaped gas with the highest sensitivity possible, even in noisy settings.

When using a sonic leak detector, it’s important to remember that the ultrasound waves may hit other objects, such as concrete or drywall, and bounce off of them. This can distort the signal, making it more difficult to identify the actual location of the leak. It is also recommended to use headphones when examining a suspected leak. This helps mitigate background noises and ensures the technician hears the most accurate and effective signal.

While many sonic leak detectors come with headphones, others can be used without them. The tool will still work as long as the technician can get close enough to the suspected leak to be able to hear it. The higher the sensitivity, the easier it will be to find the leak.

The sonic leak detection process can be complicated by environmental factors, such as windy conditions or contaminants that may interfere with the sonic signals. Whether the leak is on a roof or inside a pipe, it’s always important to consider these factors when choosing the best leak detection method. While a highly sensitive leak detector can find the smallest amounts of refrigerant, there are better methods for a windy rooftop or contaminated pipe.

There are several technologies for tracking fugitive methane gas, each with advantages and disadvantages. Most detect methane, the primary component of natural gas and a major contributor to climate change as a greenhouse gas (GHG). Depending on the desired result, these technologies can be used in aerial or terrestrial applications.

UK firm QLM Technology has developed a lidar imaging system that can build up a map of greenhouse gases such as methane in real time. UAVs can deploy it to scan infrastructure. The system uses a tunable diode laser absorption spectroscopy sensor with time-correlated single-photon counting to measure direct and diffuse atmospheric emissions. This allows the system to see a complete picture of greenhouse gas levels in a given area and identify leaks much faster than other methods.

The system also provides the capability to differentiate pipeline methane from other sources such as biogenic, swamp, marsh, sewer gas, or further decomposition in parts-per-billion (ppb), which can be used to center indications for follow-up investigations and leak pinpointing by boots on the ground. It can also be paired with a backscatter detector to provide lower explosive limit (LEL) and percent gas readings.

This is a highly efficient system compared to traditional portable and mobile flame-ionization leak detection equipment, which requires hydrogen and nitrogen fuel for power and external bottles of calibration gases. It also eliminates the need for technicians to walk or drive over piping networks in harsh weather and conditions, which is both costly and dangerous.

This technology is being used by companies such as ExxonMobil to track methane leaks over vast and remote areas of the country. It can help them save money, increase the speed at which they detect and address leaks, and reduce GHG emissions.

In a recent pilot project with SoCalGas, Bridger Photonics used an airborne UAV with a gas-mapping LiDAR sensor to survey a pipeline network. Each day, the company sent SoCalGas a digital map that displayed gas plume images and indicated the location of each leak with GPS coordinates. The system also provided methane concentrations for each identified leak. VIGO Photonics offers a broad range of infrared (IR) detection products and can help customers select the right sensors for their gas leak detection needs.

Water leaks and excessive moisture can cause serious damage if left unchecked, but they can be difficult to spot until it is too late. Home service professionals and leak detection specialists use a non-invasive method of inspection called thermal imaging to locate water leaks, rot, mold, and other problems hidden behind walls or beneath floorboards.

A thermal camera displays color-coded images on a screen according to temperature variances on the surface being scanned. It can identify hot and cold areas in a building, but it is most commonly used to inspect pipes and plumbing for signs of moisture. The thermal imagery shows different temperatures on the surface of a pipe, and a water leak will create an anomaly that can be easily spotted with this tool.

Using a thermal imaging camera is simple, but it requires the expertise and training of a professional. The camera operator scans the area, and then a computer program will analyze the information to find the source of the problem. This is a non-invasive way of inspecting areas, and it can save time, money, and inconvenience for the occupants of the building.

A thermal imaging camera can also be used with other leak detection tools, such as acoustic and tracer gas, to pinpoint the location of a water leak more accurately. A thermal imaging camera can give a rough indication of where the leak is, but it will not be able to tell you which pipe it is on or exactly what is causing the problem.

If you suspect you have a leak, contact a home service specialist or plumber today to book a visit. A reputable company should include a thermal imaging camera in their leak detection package, and they can advise you on the best way to proceed.

Leaky pipes and excessive moisture can cause major damage to your property, so detecting them early on is essential. A reputable company should use a range of leak detection techniques to find the source of the problem and make the necessary repairs.

Leak detection equipment is vital for various applications in the energy and manufacturing industries. From oil pipelines to fuel pumps, chemical gasses and other materials move through different systems where leaks may occur. Automated mechanical leak detection is crucial for ensuring that these valuable resources do not escape and contaminate the environment and communicating any such issues to the appropriate personnel.

In the industrial world, the main reason for leak detection is to ensure that the flow of materials does not exceed a set limit, preventing overflows and spills, which can be costly and hazardous to workers and the environment. These systems continuously monitor a system for leaks and alert relevant personnel when detected. This prevents expensive product loss, directly impacting a company’s bottom line.

For household leak detection, the primary concern is plumbing leaks, which can damage the home and cost a great deal of money in damages. In addition, a single plumbing leak can waste thousands of gallons of water over time, adding to a large monthly bill for the average American household. A quality leak detection system can prevent these issues by monitoring a home’s water usage and detecting any unusual patterns. These systems can then trigger an automated or remote shut-off of the water to prevent the issue from worsening, allowing homeowners to save money and water.

Several mechanical leak detection devices are available, including ultrasonic and pressure sensors, temperature sensors, and infrared cameras. Many of these devices can be programmed to shut off a water supply based on usage patterns, and they can even connect to smartphones for remote monitoring and notification. Some also come with a built-in shut-off valve, enabling homeowners to shut off their water from anywhere, even while on vacation or out of town.

Biological leak detection methods are also used, such as sniffing dogs trained to recognize the smell of pipeline releases and landscapers who keep the pipeline right of way clear. However, these techniques are less precise than a modern leak detection device and require significant time and labor to be effective.